
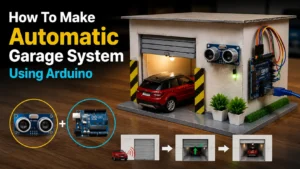
How To Make Automatic Garage System Using Arduino
Automatic Garage
I built this project using a cardboard garage, an HC-SR04 ultrasonic sensor, and an Arduino Uno. When the toy car comes within approximately 15 cm of the garage entrance, the sensor detects it and sends a signal to the Arduino. The Arduino then rotates a servo motor that lifts the garage door automatically.
Components & Materials Used
The best part is that the entire project can be completed in a few hours using inexpensive components.
- Arduino Uno – https://amzn.to/4ahJRjp
- HC-SR04 Ultrasonic Sensor – https://amzn.to/49IsQih
- SG90 Servo Motor – https://amzn.to/4dZURV7
- Cardboard Sheets
- Ice Cream Sticks
- Jumper Wires – https://amzn.to/4xt23AP
- Hot Glue Gun
- LED (Optional)
- USB Cable – https://amzn.to/4odYOZF
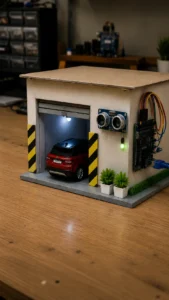
Making the Garage Structure
First, I created the garage body using foam board.
The shutter door was made from ice cream sticks glued together to create a realistic garage appearance.
The servo motor was installed inside the roof section so it could pull the garage door upward.
Installing the Ultrasonic Sensor
The HC-SR04 sensor was mounted above the garage entrance because this position provides the most accurate vehicle detection.
When the toy car approaches, the sensor measures the distance continuously and sends the data to the Arduino.
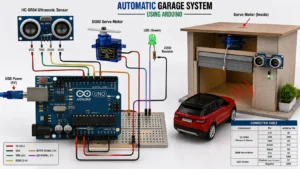
Circuit Diagram Connections
Ultrasonic Sensor
- VCC → 5V
- GND → GND
- TRIG → Pin 9
- ECHO → Pin 10
Servo Motor
- Signal → Pin 6
- VCC → 5V
- GND → GND
LED (Optional)
- Positive → Pin 7 through 220Ω resistor
- Negative → GND
Arduino Programming
You can also program with the ArduinoIDE software or the ArduinoDroid app.
#include <Servo.h>
Servo garageDoor;
const int trigPin = 9;
const int echoPin = 10;
const int ledPin = 7;
long duration;
int distance;
void setup()
{
pinMode(trigPin, OUTPUT);
pinMode(echoPin, INPUT);
pinMode(ledPin, OUTPUT);
garageDoor.attach(6);
garageDoor.write(0);
Serial.begin(9600);
}
void loop()
{
digitalWrite(trigPin, LOW);
delayMicroseconds(2);
digitalWrite(trigPin, HIGH);
delayMicroseconds(10);
digitalWrite(trigPin, LOW);
duration = pulseIn(echoPin, HIGH);
distance = duration * 0.034 / 2;
Serial.print(“Distance: “);
Serial.println(distance);
if(distance < 15)
{
digitalWrite(ledPin, HIGH);
garageDoor.write(90);
delay(5000);
garageDoor.write(0);
digitalWrite(ledPin, LOW);
}
delay(200);
}
How the Project Works
- Car approaches garage.
- Ultrasonic sensor measures distance.
- Arduino receives the distance value.
- Servo motor rotates 90 degrees.
- Garage door opens.
- Car enters.
- Door closes automatically after a few seconds.
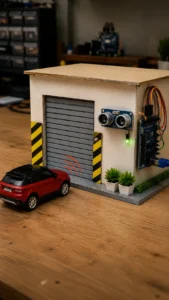
Final Result
The completed smart garage system looks realistic and demonstrates a practical example of automation using Arduino. It is an excellent project for students who want to learn sensors, programming, and smart home technology while creating something visually impressive.